Managing Recipients of Private Loan Files
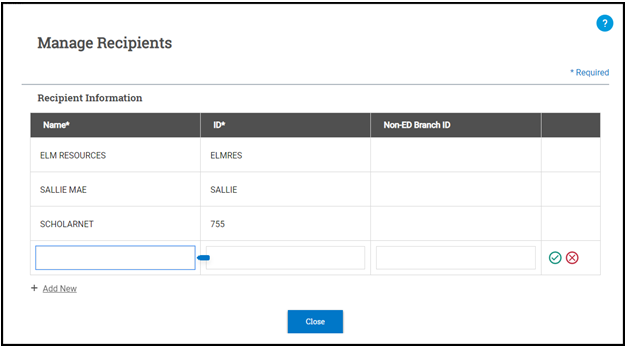
The Managing Recipients feature within Private Loans Export allows you to store information for any service providers, lenders, or others to whom you send private loan files. A recipient must be added to this table before it can be used in the Private Loan Export process.
To add and manage recipients within private loans complete the following steps:

Select Manage Recipients in the Private Loans Export header and add a new recipient.
- Select Manage Recipients in the top right corner of the Private Loans Export header.
- To add a new recipient, select the +Add New option at the bottom left corner of the existing Recipient Information list. A new line is displayed below any existing recipient.
Tip: The three most common service providers are already provided for you and cannot be edited or deleted (ELM Resources, Sallie Mae, and ScholarNet).
-
Fill in the Name, ID, and Non-ED Branch ID (if applicable) fields and select the Save
 icon once you've completed filling in the information. Alternatively, if you wish to delete your progress, select the Cancel
  icon.
icon.
-
Once you've finished saving or deleting each row, select Close.

Optionally, you can choose to edit or delete an existing recipient.
- To edit an existing recipient, select the field you want to update in the appropriate row. One the update is complete, select the Save
 icon. Alternatively, if you wish to cancel your changes, select the Cancel
  icon.
icon.
-
Should you need to delete an existing recipient, select the Delete
 icon in the row of the recipient you wish to delete, and then either select the Confirm Delete
  icon to continue with the delete or select the Cancel Delete
  icon to cancel.
-
Once you finish editing or deleting your existing recipient, select Close.

