User Community Profile Setup
The PowerFAIDS user community is a great place to collaborate with your fellow colleagues across the country by asking questions, offering and reviewing answers, and networking. The user community is also a great spot to check for timely announcements about updates or issues.
To get started, register with the user community and set up your profile by following these steps:

Fill in your profile information and create your account.
- Once you've chosen to sign up, you'll be prompted with a pop-up window to fill in your information.
- Enter your email, username, name, and desired password following the instructions in the window.
Caution: Be sure to use the email address associated with your institution. If you use a different email address you might be denied access to the user community.
Tip: The username must be at least six characters in length and have a maximum of twenty-five characters in length. When possible try to create a username that includes your first and last name, such as SaraDonnelly. If you find your first and last name have already been used, try to create some close variation of your first name, last name, and numbers.
Additionally, the password must be at least eight characters in length and have six unique characters.
- Enter your title, organization, and choose the type of school you work at or programs you work with and roles or responsibilities that most closely align with your work. The more information you provide the easier it will be to connect with colleagues at similar institutions or with similar responsibilities.
- Select Create your account.
Tip: You'll receive an email asking you to verify your email before you can access anything in the user community. Check your email and be sure to follow the workflow that the verification process requires. If you don't see the verification email shortly after creating your account, be sure to check your Spam folder.

Customize your preferences and notifications settings.
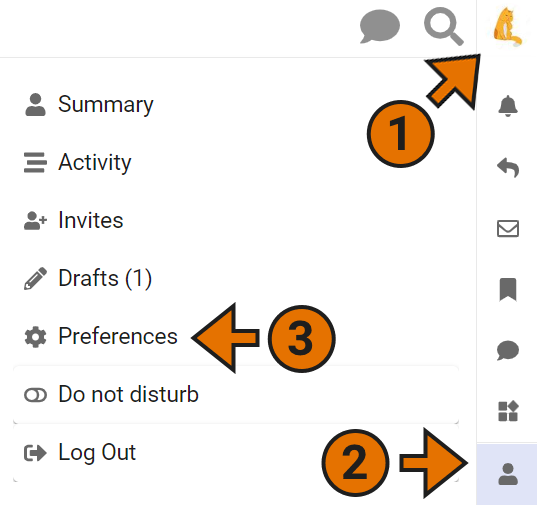
- To update your profile preferences, select your user icon (1) in the top right corner of the page.
- Choose the Profile icon (2) at the bottom of the list, and then select Preferences (3) from the options displayed on the left.
- Preferences opens to the Account section by default, but there are several other options displayed on the left.
- Select Profile to add an ‘About me’ section for your colleagues to get to know you, or update your Title, Organization, School(s)/Program(s), and Role(s)/Responsibilities as needed. It's important to fill out this section since it will help you more easily network within the User Community with colleagues in similar roles, or who perform similar tasks.
- Select Notifications and Emails to set your preferences on how frequently you receive in-browser notifications or emails for new topics, replies, and likes.
Tip: If you find a specific tag is related to your role at your institution and you want to be updated with the most recent posts and responses on related topics, you can set your notifications to update you whenever someone posts or replies using tags you choose from the list of options.
