Protecting Data on the Student Record
Note: If you're looking for information on how to restrict access to personally identifiable information (PII) on the student record, see Working with PII on the Student Record.
Many processes in PowerFAIDS are designed to automatically update associated data on the student record, in order to keep information up-to-date. This includes packaging, other batch processes, and data brought into PowerFAIDS from other systems though imported files or system integrations.
However, there may be times when you want to protect specific data from being updated by these processes (or even by other staff in your office). This can be accomplished through the use of field-level locks or entity-level shields.
Using Locks
To prevent updates to the data in a specific field on the student record, complete the following steps:
Expand the Locks menu and select View/Change Locks to display all of the field-level locks available on the page.
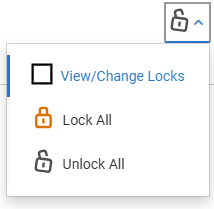
The Locks menu is typically found at the top right of the page, under the student header (1). However, in pages with data tables, an additional Locks menu may be displayed within the table for each individual row (2).

Select the open lock icon next to a field to protect the data within it. The icon will update to a closed lock to confirm this change.
Once you have updated the locks as needed, select Save.
A success message is displayed in the lower left portion of the page letting you know the student's record has been updated.
Using Shields
To prevent the system from updating data related to a specific entity on the student record, complete the following steps:
Expand the Locks menu and select Select Items to display all of the entity shields available on the page.

The Shields menu can be found either:
- at the top right of the page, under the student header, or
- at the top right of an individual page section.
Select the icon of a shield with a line through it to protect the data within the associated entity. The icon will update to remove the line over the shield, confirming this change.
This serves as a way to protect the entire entity instead of just a specific field. So for example, on the aid package, you could update the Award Amount field and then lock it to prevent further updates to that field while still allowing other updates to the award, or you could shield the data at the award level to fully prevent the award from being updated by automated packaging.
Once you have updated the shields as needed, select Save.
A success message is displayed in the lower left portion of the page letting you know the student's record has been updated.