Adding a Requirement to a Student Record
Requirements are a way to track a student's required actions in PowerFAIDS as they relate to their financial aid processing. You are able to add requirements to a student record either manually or via selection sets.
To manually add a requirement to the the student record, complete the following steps:

- Select Add.
A success message is displayed in the lower left portion of the page letting you know the requirement has been added.
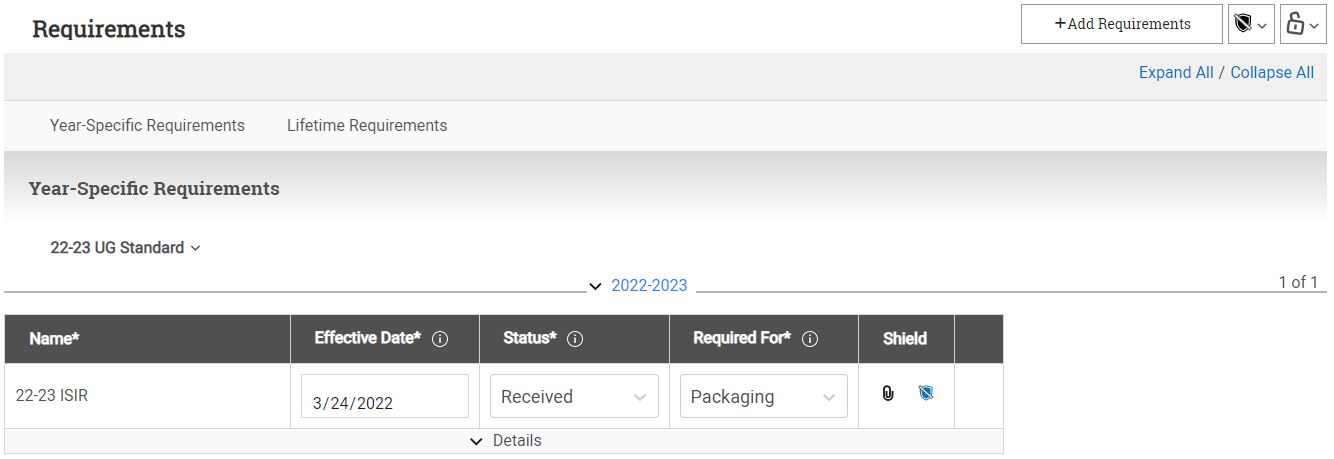
The requirement is now displayed in the student’s list of requirements under the associated academic year or in the Lifetime Requirements section.

Update student level data for the requirement as necessary.
- Select the Year-Specific Requirements or Lifetime Requirements section to view the associated list of requirements and make any necessary edits. If you are editing a year-specific requirement, select the associated academic year from the list.
- Expand the requirement details to view additional information about the requirement and to view any related attachments.
Tip: Use the field level help included in the PowerFAIDS user interface for fields you are unsure about by selecting the info  icon next to the field in question.
- Update the Effective Date of the requirement as needed, such as to back date misplaced forms or delayed information.
- Update the Status of the requirement as needed. There are nine different status options your office can define within your aid processing workflow. When defining these statuses, keep in mind how each status affects the tracking status in relation to the process that requirement in required for:
| Not Received | Prevents tracking status from moving forward. |
| Incomplete | Prevents tracking status from moving forward. |
| Not Signed | Prevents tracking status from moving forward. |
| Pending Review | Prevents tracking status from moving forward. |
| Received | Does not prevent tracking status from moving forward. |
| Reviewed | Does not prevent tracking status from moving forward. |
| Appeal Approved | Does not prevent tracking status from moving forward. |
| Appeal Not Approved | Does not prevent tracking status from moving forward. |
| Waived | Does not prevent tracking status from moving forward. |
- Attach any files that correspond with the requirement.
- Select the Attachments icon
 to open the Attach Files window.
 - Select Browse and choose the file you want to attach to the requirement. Alternatively, you can drag and drop files into the window. Once you select Open, your document title will be listed in the window.
Tip: You can attach multiple files before selecting Attach. The files must be a PDF or JPEG.
- Select Attach. You will see a number above the icon representing the amount of documents attached to the requirement.
- If needed, shield the requirement from any system-driven updates. The shield is used to prevent the system driven updates from removing the requirement from a student record in the event that the student falls out of the associated selection set.

Save any changes to the requirement.
Once you have updated the requirement as needed, select Save.
A success message is displayed in the lower left portion of the page letting you know the student's requirements have been updated.
